Platform is the best choice for starting a scheduling business. You can white-label the design or change every line of code to make it work for you. It consists of our newly created set of apis and plug and play UI components called atoms.
Get started
Atoms
Atoms are customizable UI components handling scheduling on behalf of your users. Everything from the frontend to the backend is being handled by the atom, all you need to is import the atom and drop it in your code and you're good to go.
How to use atoms
Here's some examples around how you can use atoms in your project.
1. Google Calendar connect atom
The below code snippet renders the Google calendar connect button which syncs a user's google calendar.
import { GcalConnect } from "@calcom/atoms";

export default function Connect() {
  return (
    <main>
      <GcalConnect />
    </main>
  )
}
If you need to customize the appearance of any atom, you can pass in custom css styles via a className prop.
import { GcalConnect } from "@calcom/atoms";

export default function Connect() {
  return (
    <main>
      <GcalConnect className="h-[40px] bg-gradient-to-r from-[#8A2387] via-[#E94057] to-[#F27121] text-center text-base font-semibold text-transparent text-white hover:bg-orange-700" />
    </main>
  )
}
This is how the google calendar connect button actually looks like

2. Outlook Calendar connect atom
The below code snippet renders the Outlook calendar connect button which syncs a user's outlook calendar.
import { Connect } from "@calcom/atoms";

export default function ConnectCalendar() {
  return (
    <main>
      <Connect.OutlookCalendar />
    </main>
  )
}
If you need to customize the appearance of the atom, you can pass in custom css styles via the className prop. Additionally, if you want to pass in a custom redirect url that can be done via the redir prop.
import { Connect } from "@calcom/atoms";

export default function ConnectCalendar() {
  return (
    <main>
      <Connect.OutlookCalendar className="h-[40px] bg-gradient-to-r from-[#8A2387] via-[#E94057] to-[#F27121] text-center text-base font-semibold text-transparent text-white hover:bg-orange-700" redir="http://localhost:4321/calendars" />
    </main>
  )
}
This is how the outlook calendar connect button actually looks like

3. Apple Calendar connect atom
The below code snippet renders the Apple calendar connect button which syncs a user's apple calendar.
import { Connect } from "@calcom/atoms";

export default function ConnectCalendar() {
  return (
    <main>
      <Connect.AppleCalendar />
    </main>
  )
}
If you need to customize the appearance of the atom, you can pass in custom css styles via the className prop.
import { Connect } from "@calcom/atoms";

export default function ConnectCalendar() {
  return (
    <main>
      <Connect.AppleCalendar className="h-[40px] bg-gradient-to-r from-[#E94057] to-[#F27121] text-center text-base font-semibold text-transparent text-white hover:bg-orange-700" />
    </main>
  )
}
This is how the apple calendar connect button actually looks like.

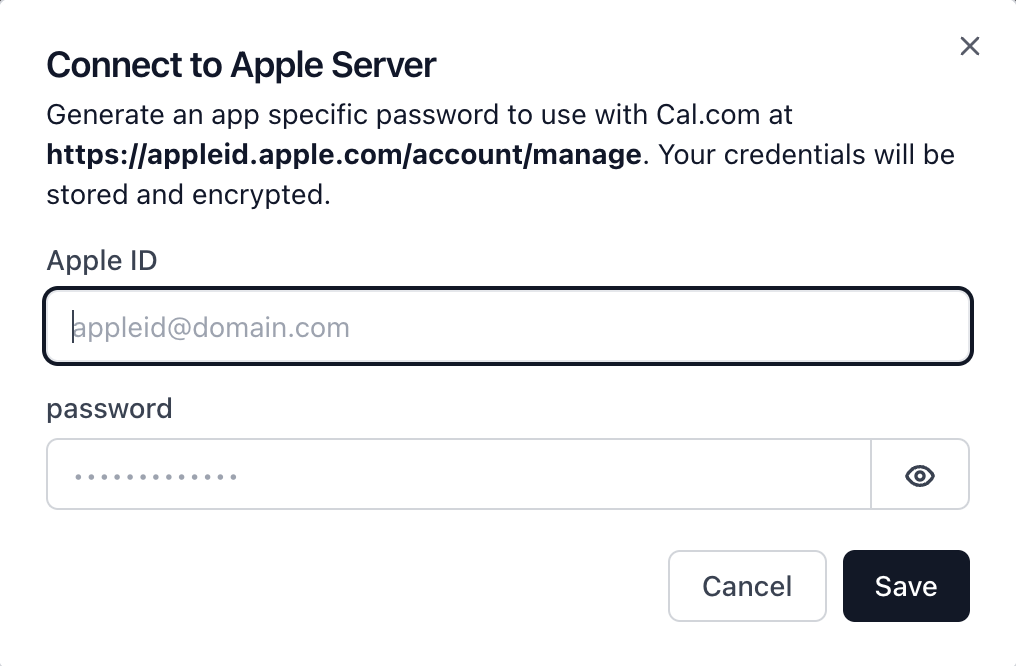
The apple calendar atom works a bit differently than outlook and google calendar. We don't get redirected to an OAuth consent page, instead a modal appears which prompts us to create an app specific password to use with Cal.com; this is how the modal looks like
4. Availability settings atom
The below code snippet renders the availability settings atom through which a user can set their available time slots.
import { AvailabilitySettings } from "@calcom/atoms";

export default function Availability() {
  return (
    <>
       <AvailabilitySettings
          onUpdateSuccess={() => {
            console.log("Updated schedule successfully");
          }}
          onDeleteSuccess={() => {
            console.log("Deleted schedule successfully");
          }}
       />
    <>
  )
}
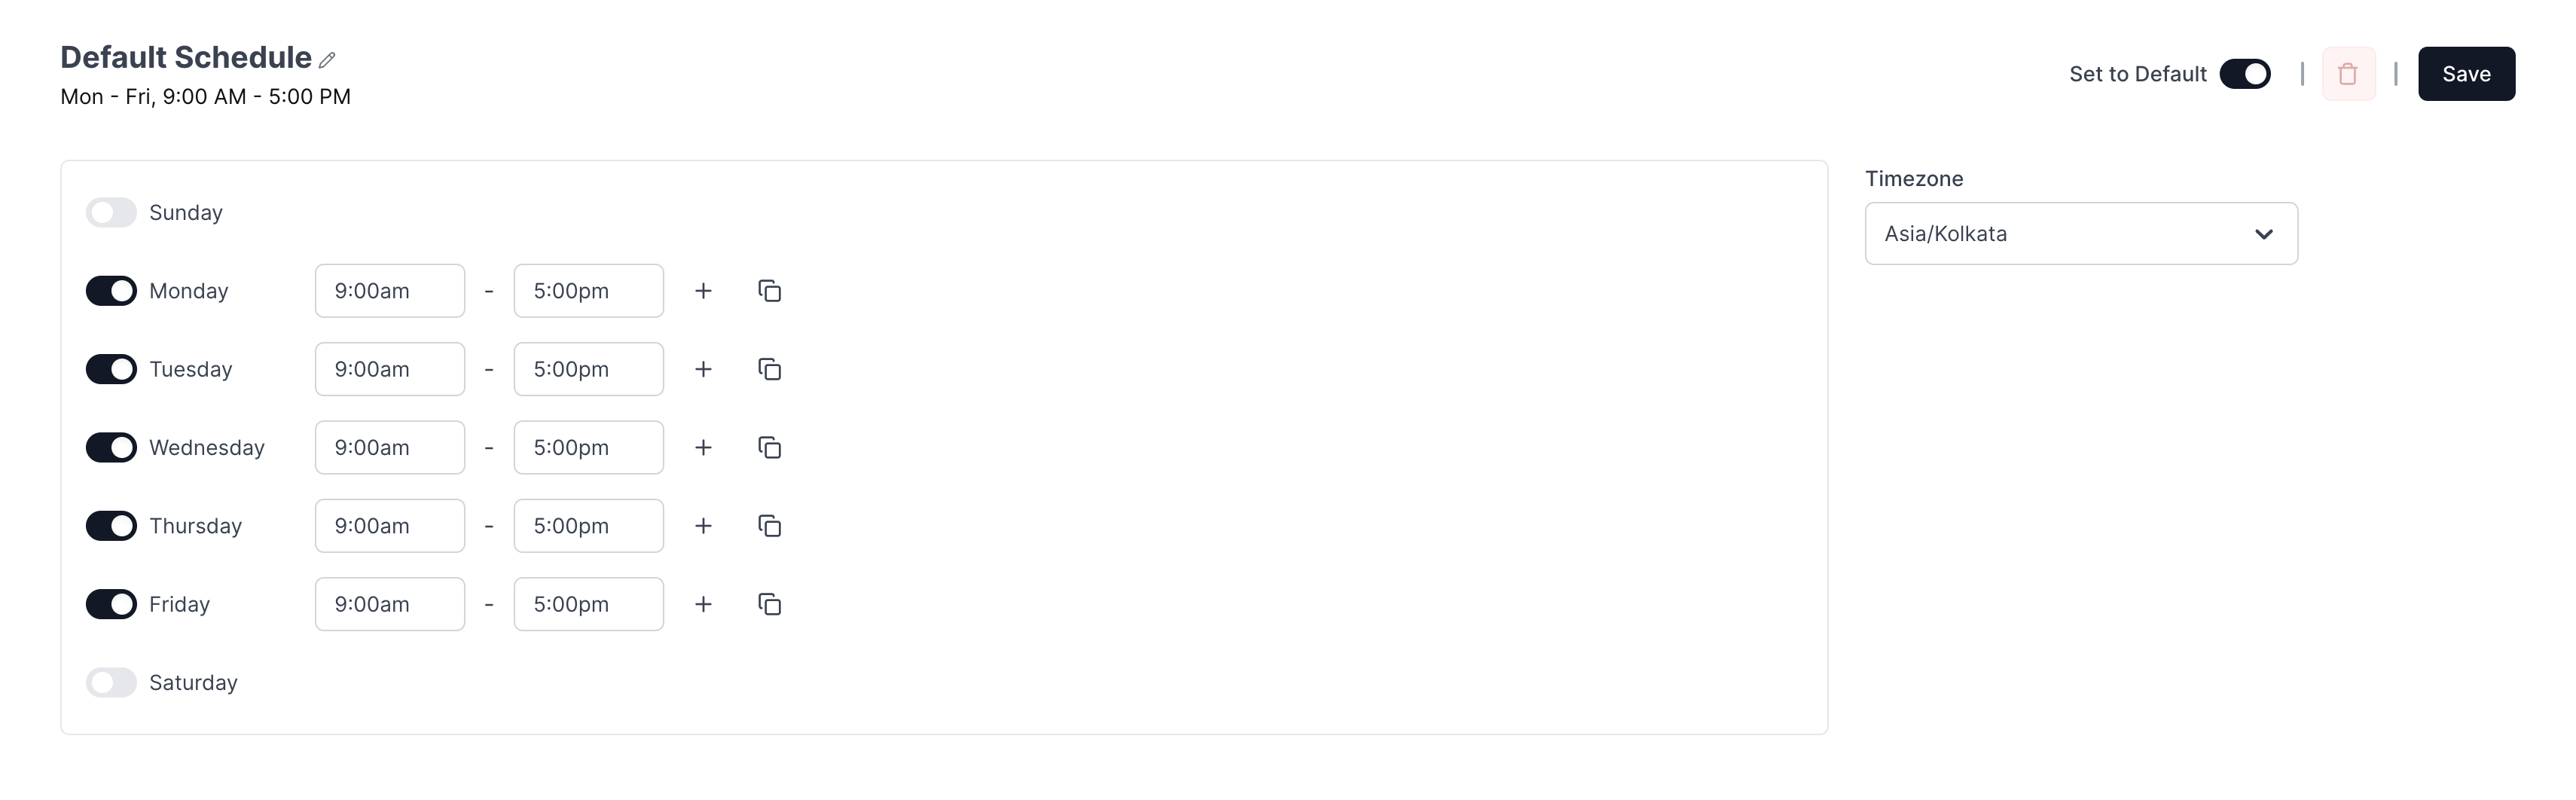
This is how the availability settings atom actually looks like
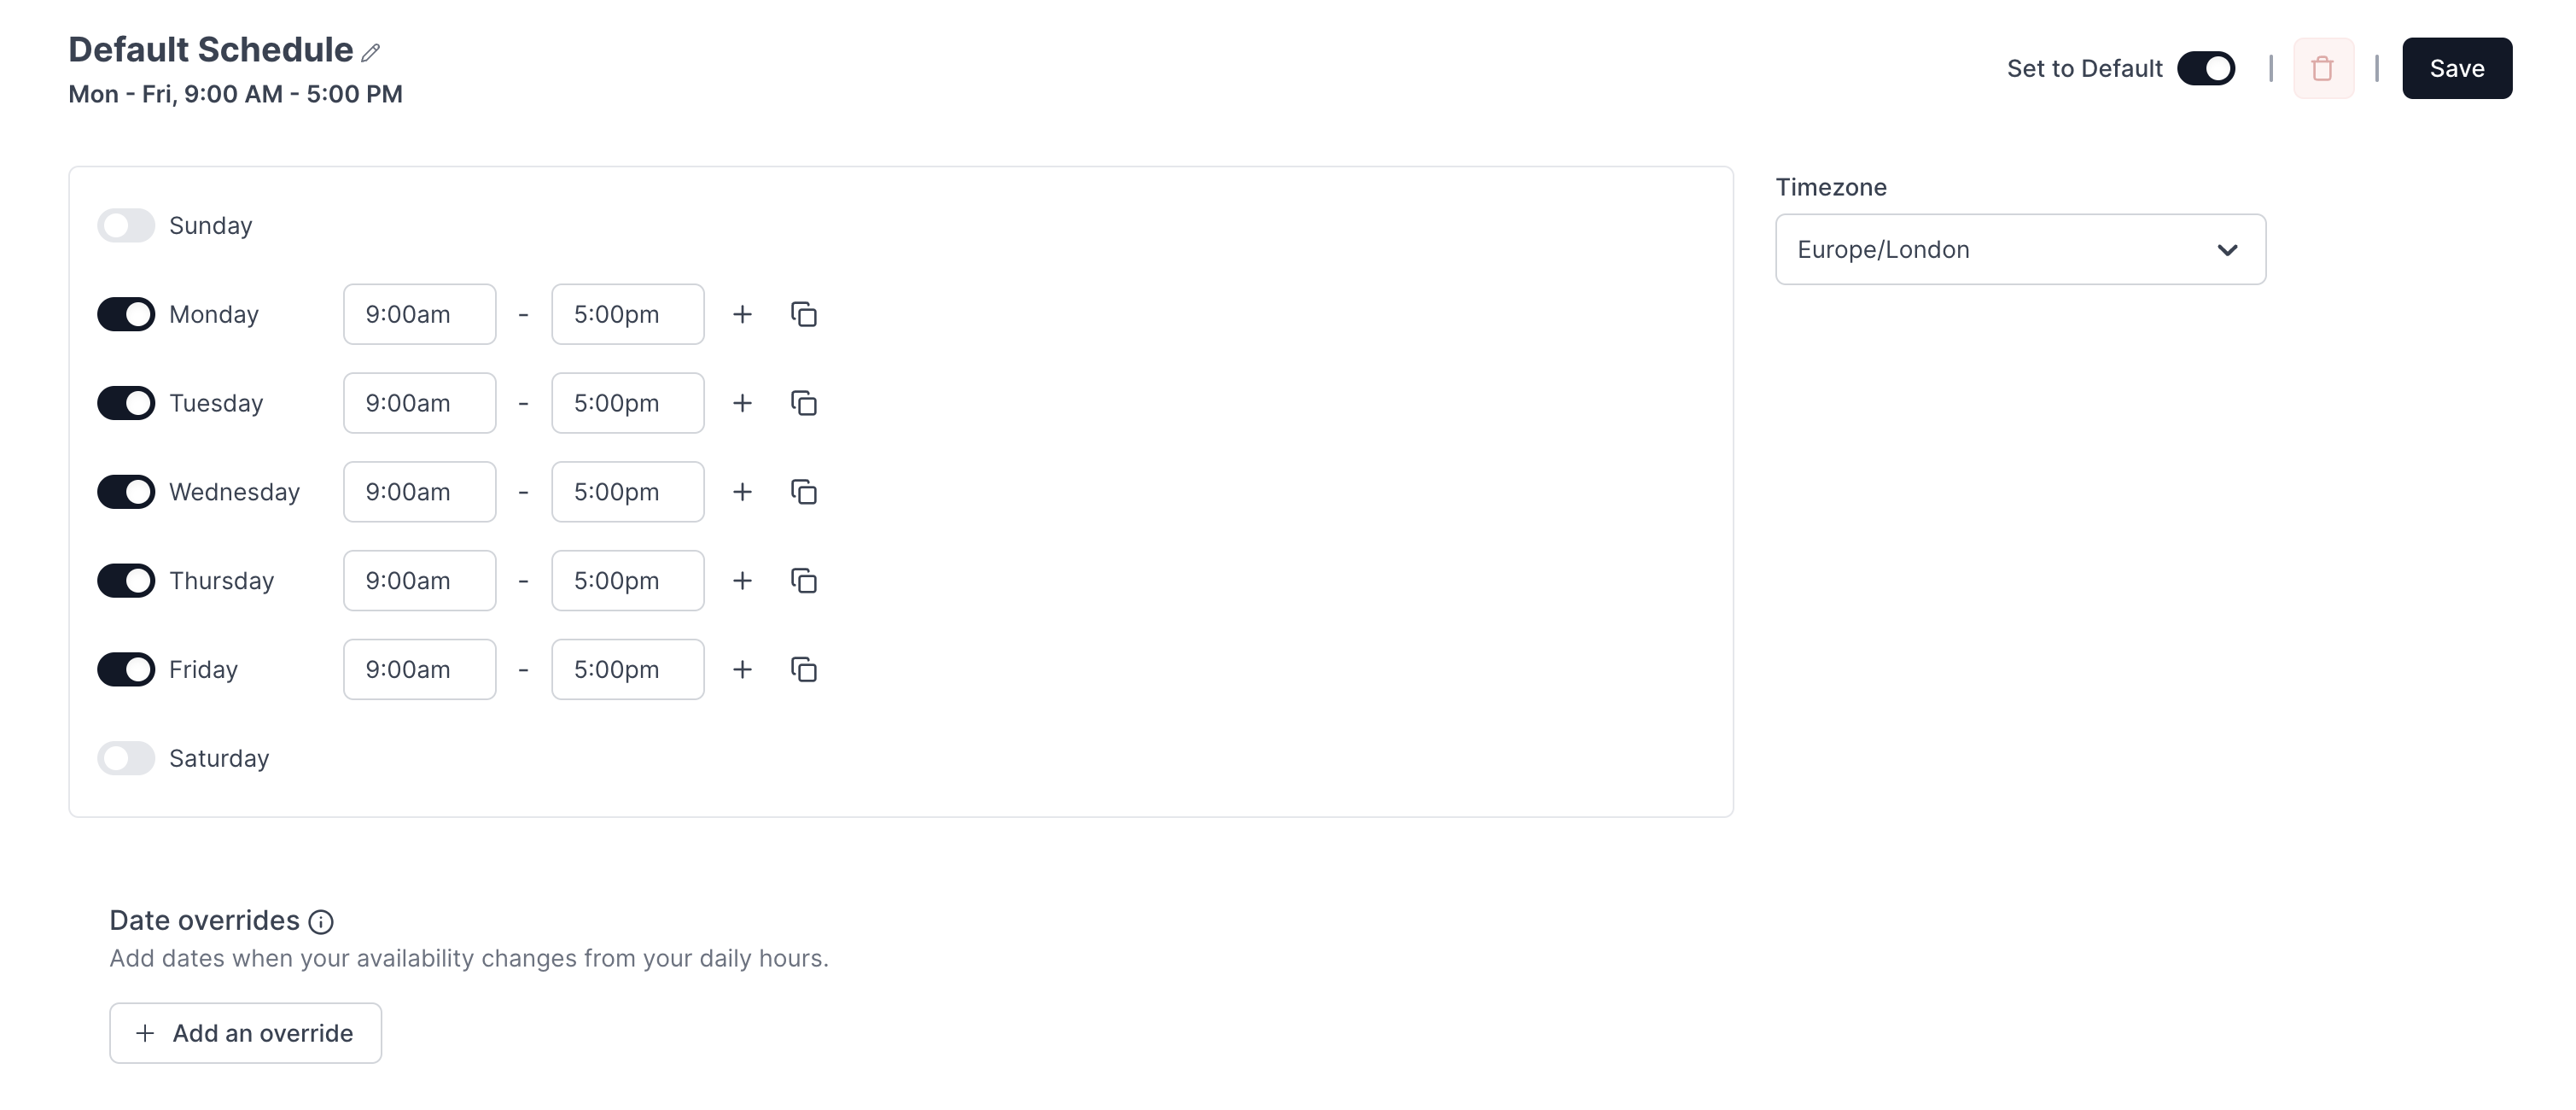
If a user wishes to add further adjustments to their availability for special occasions or events, they can use the date overrides feature. Date overrides enables users to pick any date that they're currently available and set specific hours for availability on that day or mark themselves entirely unavailable. Once that day is passed, the date override is automatically deleted.
The below code snippet renders date overrides into the availability settings atom
import { AvailabilitySettings } from "@calcom/atoms";

export default function Availability() {
  return (
    <>
       <AvailabilitySettings
          enableOverrides={true}
          onUpdateSuccess={() => {
            console.log("Updated schedule successfully");
          }}
          onDeleteSuccess={() => {
            console.log("Deleted schedule successfully");
          }}
       />
    <>
  )
}
This is how the availability settings atom actually looks like with date overrides
When a user tries to add date overrides for their availability, a modal appears which prompts the user to select the date and availability they want to override.
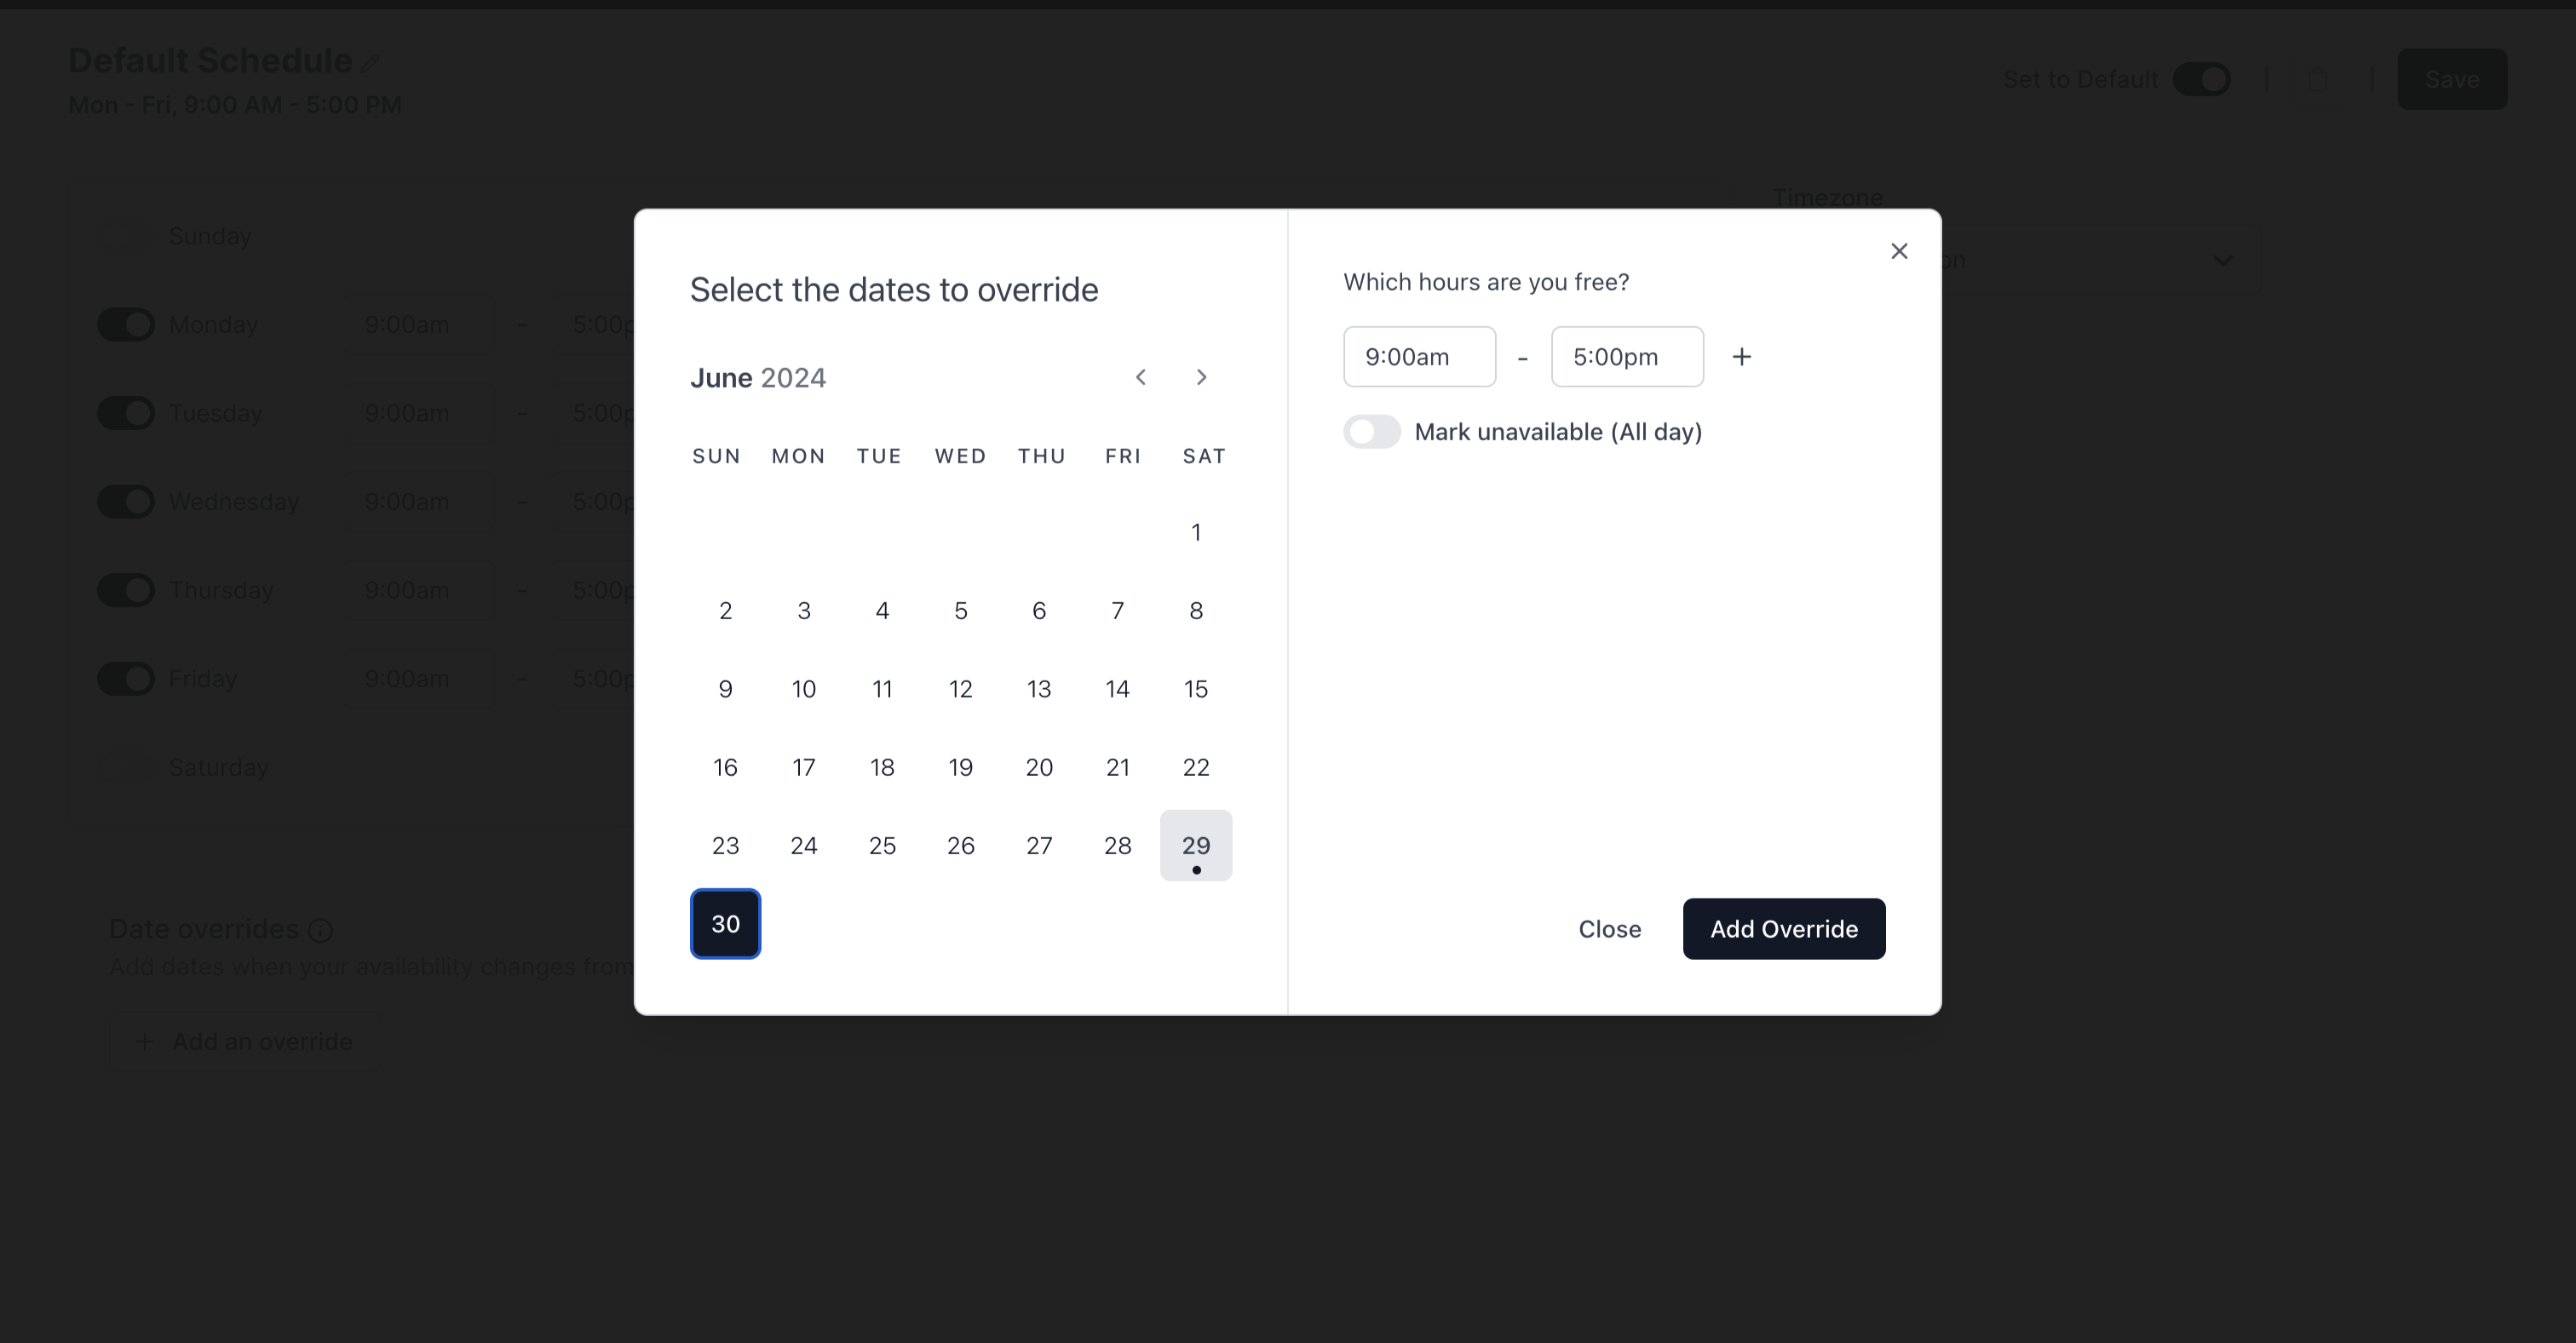
After successfully adding a date override, this is how the availability settings atom looks like

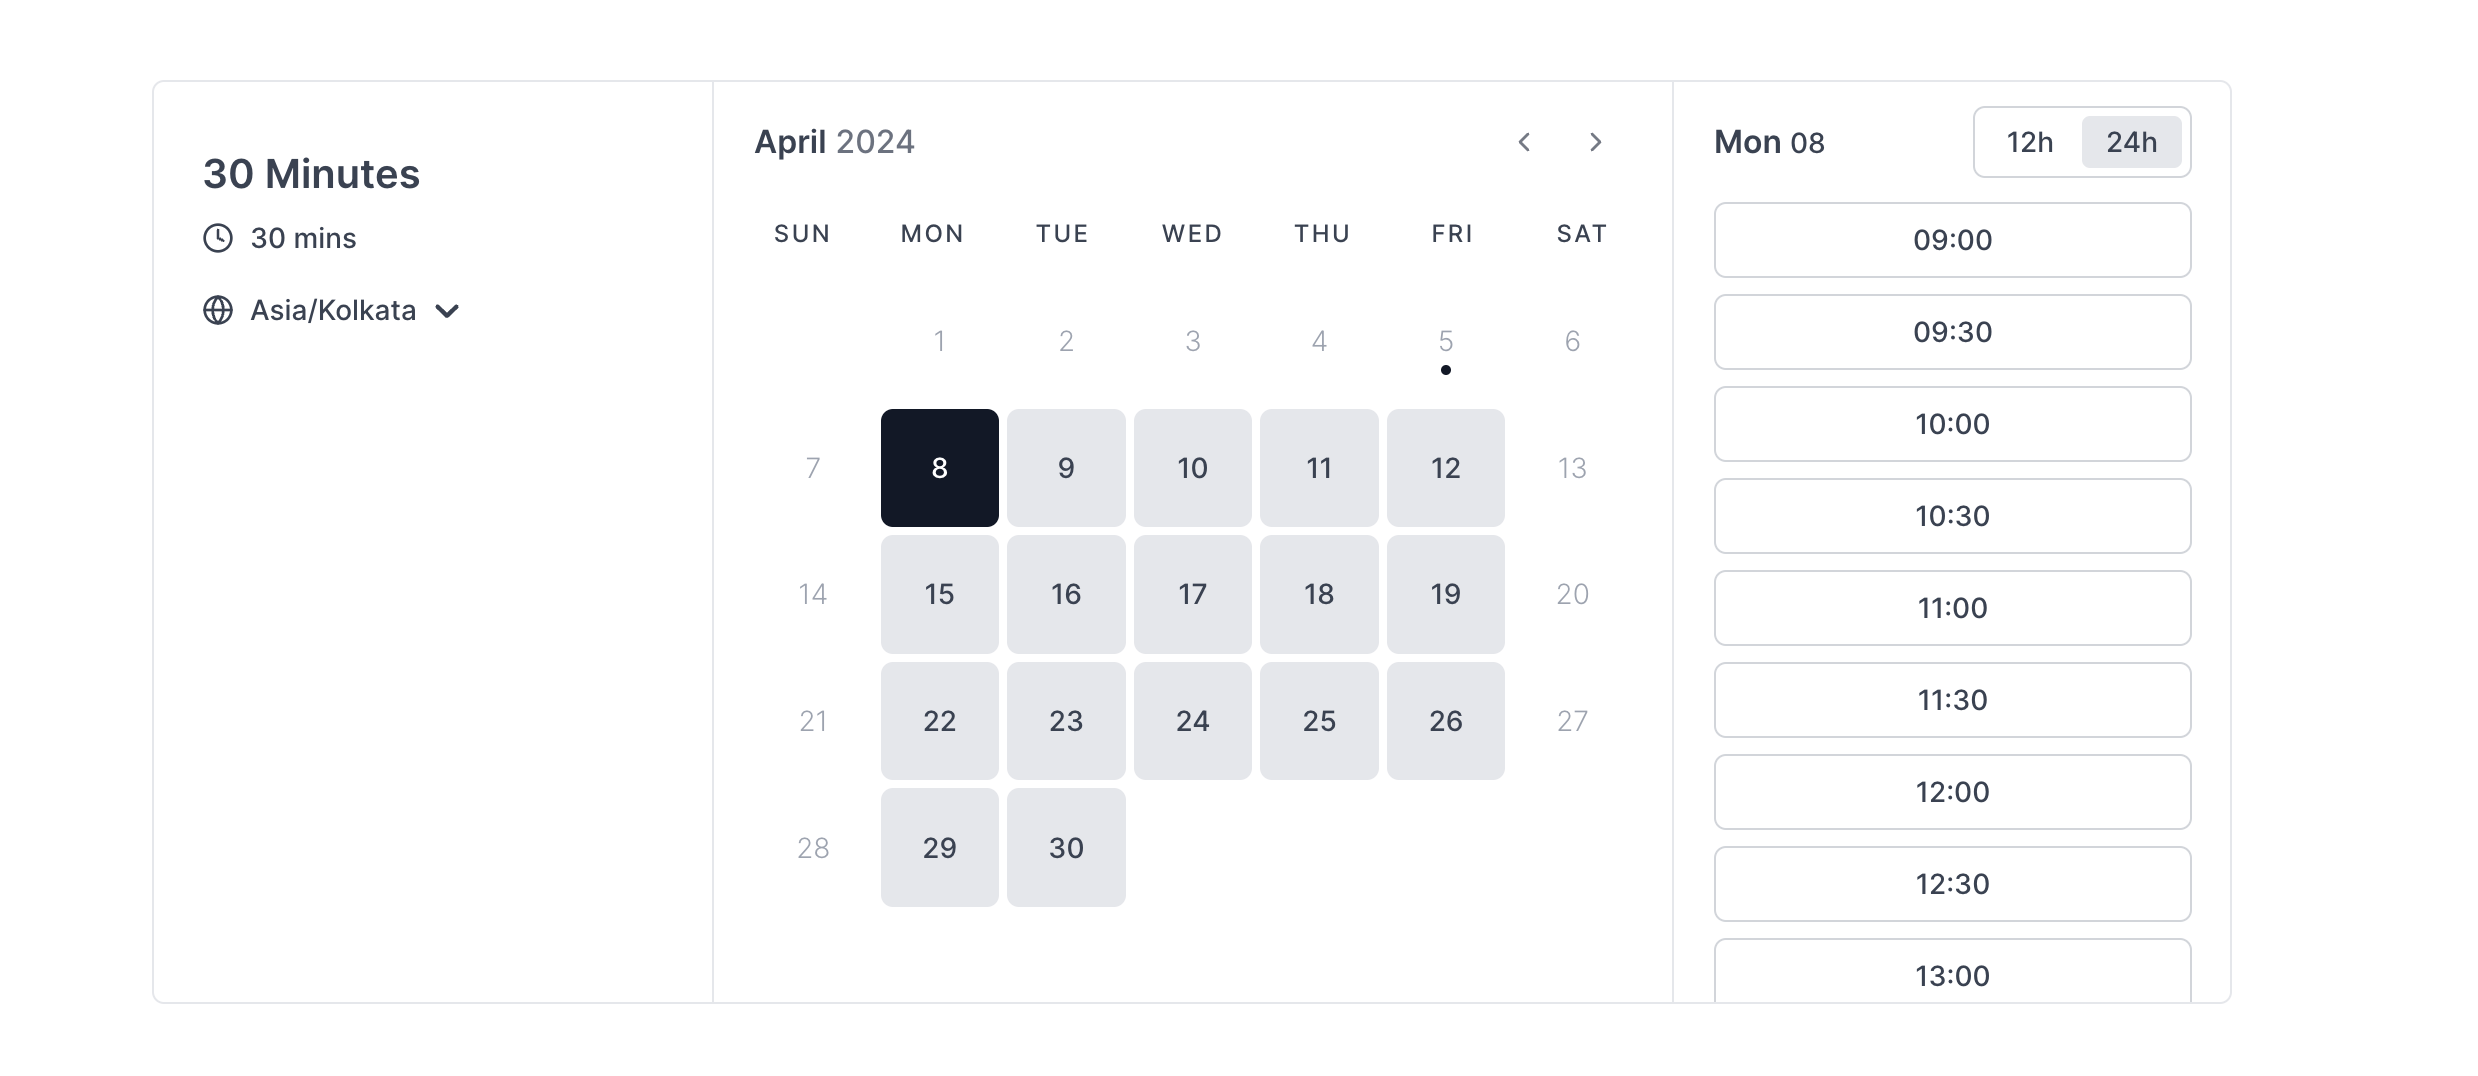
5. Booker atom
The below code snippet renders the booker atom through which a user can be booked for any event that they have set.
import { Booker } from "@calcom/atoms";

export default function Booker( props : BookerProps ) {
  return (
    <>
      <Booker
        eventSlug={props.eventTypeSlug}
        username={props.calUsername}
        onCreateBookingSuccess={() => {
          console.log("booking created successfully");
         }}
      />
    <>
  )
}
This is how the booker atom actually looks like
6. Booker embed atom
The below code snippet renders the booker embed atom through which an existing user can embed cal.com into their own website without the need to create an OAuth client or access token. All that is required is the username and event slug of their already existing account. This is the key difference between the booker atom and the booker embed atom.
import { BookerEmbed } from "@calcom/atoms";

export default function BookerEmbed( props : BookerEmbedProps ) {
  return (
    <>
      <BookerEmbed
        eventSlug={props.eventTypeSlug}
        username={props.calUsername}
        onCreateBookingSuccess={() => {
          console.log("booking created successfully");
         }}
      />
    <>
  )
}
This is how the booker embed atom actually looks like
Platform apis
We've also created a set of new and scalable apis for our platform customers called v2 which we plan to make the successor for our v1 apis. Internally all the atoms use the new platform apis to handle scheduling.
How to use platform apis
Once you set up an OAuth client and create a managed user for that particular OAuth client you're ready to use the platform api. Below are some examples around how you can use the platform api endpoints in your project.
1. me
The /me endpoint returns a response containing all the info about a managed user. It includes properties such as the name, email, id, timeZone of that particular user and much more. The below code snippet shows a custom hook that uses the /me endpoint to return all the data of a managed user.
// custom hook that returns info managed user
export const useMe = async () => {
  const response = await fetch("https://api.cal.com/v2/ee/me", {
    method: "GET",
    headers: {
      "Content-Type": "application/json",
      // replace accessToken value with value of your access token
      Authorization: `Bearer ${accessToken}`,
    },
  });
  const data = await response.json();

  return data;
};
The below code snippet shows how the returned response looks like.
{
  "status": "success",
  "data": {
      "id": 48,
      "email": "[email protected]",
      "timeFormat": 12,
      "defaultScheduleId": 107,
      "weekStart": "Sunday",
      "timeZone": "Asia/Calcutta",
      "username": "skybezagxi",
      "name": "John Jones"
  }
}
2. schedules
The /schedules endpoint returns a given schedule for a managed user based on the id of that particular schedule. The below code snippet shows a custom hook that uses the /schedules endpoint to return the default schedule of a managed user.
// custom hook that returns the schedule of a managed user
export const useGetUserSchedule = async () => {
  // replace scheduleId with id of your schedule
  const response = await fetch(`https://api.cal.com/v2/schedules/${scheduleId}`, {
    method: "GET",
    headers: {
      "Content-Type": "application/json",
      // replace accessToken value with value of your access token
      Authorization: `Bearer ${accessToken}`,
    },
  });
  const data = await response.json();

  return data;
};
The below code snippet shows how the returned response looks like.
{
  "status": "success",
  "data": {
    "id": 107,
    "name": "Default Schedule",
    "isManaged": false,
    "workingHours": [
        {
            "days": [
                1,
                2,
                3,
                4,
                5
            ],
            "startTime": 540,
            "endTime": 1020,
            "userId": 48
        }
    ],
    "schedule": [
         {
             "id": 106,
             "userId": 48,
             "eventTypeId": null,
             "days": [
                 1,
                 2,
                 3,
                 4,
                 5
             ],
             "startTime": "1970-01-01T09:00:00.000Z",
             "endTime": "1970-01-01T17:00:00.000Z",
             "date": null,
             "scheduleId": 107
         }
    ],
    "availability": [
        [],
        [
            {
                "start": "2024-04-07T09:00:00.000Z",
                "end": "2024-04-07T17:00:00.000Z"
            }
        ],
        [
            {
                "start": "2024-04-07T09:00:00.000Z",
                "end": "2024-04-07T17:00:00.000Z"
            }
        ],
        [
            {
                "start": "2024-04-07T09:00:00.000Z",
                "end": "2024-04-07T17:00:00.000Z"
            }
        ],
        [
            {
                "start": "2024-04-07T09:00:00.000Z",
                "end": "2024-04-07T17:00:00.000Z"
            }
        ],
        [
            {
                "start": "2024-04-07T09:00:00.000Z",
                "end": "2024-04-07T17:00:00.000Z"
            }
        ],
        []
    ],
    "timeZone": "Asia/Calcutta",
    "dateOverrides": [],
    "isDefault": true,
    "isLastSchedule": true,
    "readOnly": false
  }
}
To check all the available endpoints click here